This morning, at Bethlehem Lutheran I attached some potato and onion sacks to the fence to serve as a barrier to keep the soil inside the garden. In order to make it prettier, I also planted some succulents along the fence. Their roots will not only hold the soil in place, but it also grow strong with out much water.
Succulents (plants with a waxy coating on their leaves - like aloe) are a great addition to California gardens, because they can cover large spaces and conserve valuable water resources. Mixing lots of different types of succulents next to each other can also make a very beautiful look and provide rich textures. I also think that the green and purple of the succulents look really beautiful next to the orange of the potato sacks.
Succulents are very forgiving, so they're great for inexperienced gardeners. You can transplant them by breaking off a branch/stem and simply sticking it in some soil. Just be careful not to over water them. You'll know if this is happening because they will start to turn brown.
Showing posts with label diy. Show all posts
Sunday, April 25, 2010
Wednesday, April 7, 2010
Fence Gardens - 3 Types - DIY
Today at the Free Farm, we completed 3 projects that will grow on the fence. Our goal is to get some plants growing on the fence to make the space look prettier (both inside and out) and to create a noise barrier from all the street noise.
Here are three easy do-it-yourself projects that would be easy for you to complete on your own.
Our first project is the easiest. Take a plant that grows quickly like a vine, and likes to climb and train it to climb a fence. How do you train a plant? I used twine. It's as easy as gently tying it to the fence guiding it in the direction you want it to grow.
The photo to the left is of a Marsh Mallow (yup that's it's real name) that was growing wild near the fence at the Farm. So, I trained it to climb the fence and labeled the plant so that it could be read on both sides of the fence.
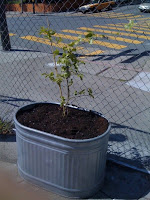
The second project, is also very simple. In fact all I did was fill a metal container with soil (potting soil + horse manure), plant a passion fruit and train the vine to attach to the fence. The passion fruit also has some support from some bamboo shoots to help it get to the fence and grow tall.
As you can see from the photo above, we needed the container because this section of the garden has concrete on it. If your fence is next to soil, you can plant right into the ground.
The third project is a little more complicated, but only took an hour from start to finish. I made a small pocket out of potato sacks and chicken wires. Then I filled it with dirt and planted a nasturtium and trained it to the fence.
Click here if you would like the complete instructions on how to make the vertical garden pocket on a fence.
Monday, February 15, 2010
Fruit Trees, Compost, and a Labyrinth!
Maybe it only looks like trash bags covering heaps of who-knows-what and a black bin to you, but it's so much more! This is the beginning of the Free Farm's composting system. There is a place for our food scraps from lunch, the invasive plants found at the site, and thick, woody materials, too. Composting space on a farm. Gotta have it! Below is a picture of our composting committee. Thanks so much, you three!
The picture below shows Tree sharing his knowledge of fruit trees. He taught us how to prune the tree so it will stay low. He also cleared up a problem lots of folks run into during tree planting. Rather than digging a hole and surrounding the tree with all nutrient rich material, the native soil should be mixed with the organic matter.
Also, Pastor Megan has been making serious headway with the meditation labyrinth. Make sure to check out the link to see how fabulously it's coming along!
Labels:
CA,
community gardening,
creative gardening,
design,
diy,
eddy and gough,
farming,
free farm,
labyrinth,
local food,
lot garden,
San Francisco,
WELCOME,
work days
DIY: Learn to double dig raised beds
This Saturday workday our group got two beds ready for planting! Tree gave us a tutorial on how to prepare them by double digging.
Step 1.) Your beds should have a 4-6" layer of compost on top to start with.
Step 2.) See Tree there in the photo below with the shovel in as deep as the shovel's head? That's as far down as you want to dig. You also only need a width of one shovel's head.
Step 3.) The soil from the first trench should be placed in a wheel barrow. That soil goes to the far end of the bed where it will be used to fill in the last trench.
Step 4.) Stick a digging fork in the trench you just dug so the tongs are fully submerged. Wiggle the fork around to loosen up the soil. This wiggling aerates the soil allowing roots more space and increasing drainage.
Step 5.) Now that the soil in the first trench has been loosened up you can begin digging the second trench right beside the first; same depth, same width. The soil from the second trench (including the 4-6" of compost on top) gets put into the first trench. You're just moving dirt from hole #2 into hole #1. Easy as that.
Just keep following this pattern of digging out a trench, working the fork into the dug-out space and then digging another trench right beside it and putting the second trench's dirt into the first. Do this all the way down the line. Mixing nutrient rich compost in with your soil helps build the soil structure, making the beds a hospitable area for food growing.
After raking the beds even our beds look like this.
Saturday, February 13, 2010
DIY: Build Your Own Labyrinth - Step 3
This step: Layout beds for planting
Because our design is long and thin, some of our garden beds won't be full garden mounds. In these thin rows, we have made one foot width beds from bricks left over from the St. Paulus foundation. The more of these beds we plant, the easier it will be to tell where the labyrinth walking paths are. Below are some photos of our layout and and how we planted them.
At the end of the thin rows, the planting area expands to three feet wide as you can see here. In the 3 foot sections, is where our mounds will be. Mound planting is great for wet spaces. Wet plants go on the bottom of the mound and drier plants go closer to the top. Here we are going to be planting flowers, pretty looking, pretty smelling plants and some produce and herbs.
Below you can see that we planted some peppermint and chamomile.
Thursday, February 11, 2010
DIY: Build Your Own Garden Labyrinth - Step Two
See step one
The next step in the labyrinth is to layout the labyrinth with rocks. Luckily, my feet are a men's size 12 so it was very easy for me to measure the size of the space and line it up to the grid on the labyrinth design.
I'll upload a picture of the design we used just in case you happen to have a lot the exact size as ours.
Here you can see how I marked the distance between each row to map out the space before making my long walking paths.
It took three days to layout.
Go to step 3
Monday, February 8, 2010
Saturday Feb. 6th Recap
This past Saturday workday from 10am - 2pm started with the arrival of roughly three pick-up trucks worth of compost from the city dump. Farming in San Francisco on a large scale requires lots and lots of nutrient rich material to amend the sand-like soil. We'll be using a double-digging method to get our beds ready for planting.
This Saturday also saw some special friends from Tofu Town. They generously provided us with prepared lunches of vegan gyros and backyard gleaned fruit juice. All-in-all around 20 volunteers were fed. It was so good, I can't say enough. Thank you Tofu Town!
In keeping with the community building component of community gardening/farming our group comes together during important parts of the workday. We gather for a group huddle to lay out our plans for the day before we start, we come together again for a lunch break, and then we close by touring the farm and pointing out what's been accomplished during the day. The Free Farm project is about more than just growing food, it also seeks to nurture community amongst its contributors.
I hope you will come be a part of this growing community during our Saturday 10am - 2pm workdays.
Wednesday, February 3, 2010
DIY: Make your own garden labyrinth - Part 1
Here is step one in how to make your own garden labyrinth. We're putting our garden in an abandoned lot where lots of wild weeds grow, so our first step is to put down a root barrier. Fitting with our theme of recycling and getting our supplies for free, we used cardboard for our root barrier.
Note: This DIY tip is the same for how to make pathways in your garden - we're just doing it on a much larger scale.
Step one: Put your cardboard on the ground, each piece overlapping the one before.
Step two: Water the cardboard.
Step three: cover the cardboard with wood chips. We got ours for free from the local dump. It's from all the Christmas trees they've picked up recently!
It's that easy. Cardboard, water and wood chips. Step one completed.
Go to step 2
Labels:
diy,
free farm,
labyrinth,
St. Paulus Lutheran
Tuesday, February 2, 2010
DIY: Cover Graffiti Quickly
Yesterday I decided to cover some of the graffiti that had been collecting at the site. In three hours I was able to cover up a large portion of the graffiti. First I used a roller to cover the bricks with yellow paint. I left some of the previous graffiti in the cracks of the brick, since they provide some great character. The design is then made with spray paint. You could make the same thing with regular paint but it would take longer.
I wanted to put some items on the wall to fill the space so it wouldn't just get covered with graffiti again. It seems like when we've tried to put graffiti style lettering on the wall that it just gets painted over, so this time I tried putting up some whimsical drawings of the produce that we are currently planting and information about when we are open. This will not only cover the graffiti, but serve as a billboard to the neighborhood about when our community work days are.
The design I used is really simple and I imagine that it could be copied by others with very little artistic ability. The strawberries are just a red cone, with a green star on top. Then the green and the red are outlined by black and black dots are put on the red.
The potatoes are simply brown ovals outlined in black with green vines drawn on last.
The flowers are made by drawing a purple four leaf clover shape. puting a blue X in the middle of the flower. Then using light yellow to draw a small circle in the middle of the flower and to outline the outside of the flower. Then the outside of the flower is neatly outlined with black.
And poof, a fast mural that cheaply covers large spaces of graffiti.
Labels:
diy,
free farm,
painting,
St. Paulus Lutheran
Saturday, January 30, 2010
Wednesday, January 20, 2010
First Urban Share Garden Publication Underway
Do It Yourself Vertical Garden
by Megan Rohrer
This week I began working on the first issue of Urban Share's garden publication; a quarterly series inspired by the zine [a self-published "magazine" usually made on a Xerox machine with original art for small distribution]. The first issue will be one in a series of an ongoing quarterly publication, always free in accordance with our mission. The publication will be a limited edition and distributed to the donors and friends of WELCOME. Each issue will focus on projects that are underway at the Urban Share garden sites with original art by local San Francisco artists inspired by gardens and contributions from the seasoned gardener to the amateur gardener. Contributions will include gardening tips, DIY (do it yourself) projects, seasonal food recommendations, recipes, nutritional information and musings on urban gardening and current food movements.
[click to enlarge]
This publication has been inspired in large part by the work of the Diggers (who took their name from the original English Diggers) and emerged in San Francisco's Haight-Ashbury in the midst of the Sixties Counterculture movement. The Diggers resisted private property and an economy of currency, and chose instead a model that was based on distributing goods and services for free and an economy of barter using street theatre and art happenings to present their message. Out this movement the Sutter Street Commune began to publish an intercommunal newspaper, Kaliflower in 1969 out of the Free Print Shop. Kaliflower lasted just over three years and by the ends of its run was distributed every Thursday to nearly 300 communes in San Francisco. Below are some images of the covers of Kaliflower:
The first issue of Urban Share's publication will include a hand-made, recycled paper cover made by yours truly in my San Francisco home kitchen with original art on the cover by Megan. Inside you will find instructions on DIY (do it yourself) projects with illustrations by Megan (as seen above). They are all projects that Megan and our wonderful volunteers have worked on at the St. Paulus garden site, which you can see yourself when you come out for a visit! Original art by other local artists on sprouting, and other such fun things plus much more!
[ Stay tuned, the first issue will be released in the end of February 2010! ]
In the meantime, come on out and play with us at one of our workdays, every Saturday (except on rainy days) from 10am-2pm. Bring a sack lunch, water, closed toed shoes and clothes you don't mind getting dirty.
We hope to see you there!
~your friends at urban share
Labels:
art,
artist,
community gardening,
diy,
local food,
project,
San Francisco,
share,
WELCOME
Our Saturday the 16th Workday!
Hello Friends of the Garden!
This last Saturday workday was quite a day. Not getting rained out was a big plus! We started early with two volunteers coming in before the official 10 o'clock start time. That's a serious go-getter attitude.
A lot of our gathered materials had been left near the front of the site making our space look haphazard. We hauled the lumber, pallets, and odds n' ends down to be sorted, stacked, and organized. It wasn't long before our helter skelter piles of materials started looking like they were supposed to be there. This lot has been left unattended for years so getting it in shape can be a big job; trash has collected, weeds have sprung up all over, but we're starting to show the space the love it deserves. This is the part in the movie where the nerdy abandoned lot with box frame glasses, using a pencil to hold its hair in a bun gets a make over. "Oh my God, St. Paulus, you're simply breathtaking!" The lot really is beautiful. We've run a gas-powered weed eater through the area which not only makes the grounds look better kempt but those small clippings can also be layer with manure to mature it, leading to food for plants! Even manure's gotta grow up some time.
A lot of sweat and time was spent in creating a foot-path ramp to allow easier access into the large farm space. We loaded down wheelbarrows with dirt from the site and slowly built up our ramp. There's more work to be done there, but in one day we got so far! We have a two-fold plan for the ramp. First, we take dirt from a large hill and use that dirt to create the ramp. Second, while removing the dirt we level off the hill in order to make a clean area for a demonstration garden near the front. In the future we'll show folks in the demo garden what can be grown at certain times of the year and use it as an opportunity for gardening education. I think everyone in the project is excited to share our knowledge, experience, failures, and successes with others interested in growing their own food in the city.
Pastor Megan spent a lot of time finishing a beautiful tool shed to house our tools in! Hooray for not having to carry things from an overcrowded Pastor's office to garden and back! That was seriously cramping my style. After this Saturday workday the shed is sporting a sassy new coat of light blue paint. We're trying to teach this gray San Francisco sky what it should be doing. Doesn't seem to be listening.
Throughout the day there were lots of folks walking past stopping in to talk. You wouldn't believe how many gardeners there are in one block of the city. There are plenty of helping hands to be found. Four volunteers on Saturday (including yours truly) were Lutheran Volunteer Corps members (Thanks Margaret, Troy and Katie!), two volunteers were from just down the street, two more volunteers heard about the workday through Tree, and two more volunteers heard about the workday through Pastor Megan. Word gets around!
That's the news from the farm this week. I hope to see you out there Saturday from 10am -
2pm! Don't forget to bring a friend!
Saturday, January 16, 2010
DIY: Build a Shed from Pallets (for free)
Pallets are a great way to build a shed because they are very strong. If you don't believe me, try to take pallet apart some time. Also the way they are built, means that you don't have to worry about studs. Below is a picture of the pallets as we nailed them together. We also used some wood from crates. We could only make a portion of the frame this way before it was too heavy to lift in the hole where we were placing it.
The shape where were put our shed is unusual because there is a fence on one side and a concrete wall on the other. This location is great, because it will be really hard for someone to break into our shed. However, it also made the building a little tricky because most of the shed had to built inside this shaft.
Framing the sides took one afternoon. We decided not to build any of the roof until we would have enough time to finish the shed. We didn't want to encourage any homeless folk to sleep in the space during the rainy season. Our concern was so much that homeless would be in the space, rather that it might encourage people to use the space as a bathroom - which would make it unsafe and too smelly to make a good storage space.
It took another three hours to build the roof and to attach the door. This part of the project required the use of a battery powered table saw - so we could cut the pallets to match the angle of the roof.
On the side of the shed that is next to a fence, we purposefully left some spaces that were not covered with plywood. We covered these areas with plastic so they would act like windows and let light into the shed during the day - enabling us to see what is inside. The fence keeps that side of the shed protected so that it is not possible for a person to enter the shed through the plastic windows.One benefit of using pallets to build a shed is that there is some creative storage space inside the shed. This makes the shed more functional.
The pallets provide a great way to store tools like shovels and rakes. (see photo below) Putting the tools inside the pallets, means that you don't have to worry about tripping on them.Next, we painted the shed. This helps to protect the exposed wood from water and rain. It also makes the space look prettier. We got donated paint from local painters who would rather donate the paint then spend the money on recycling it at the dump.
Labels:
creative gardening,
diy,
San Francisco,
St. Paulus Lutheran
Subscribe to:
Posts (Atom)